地形轉檔視窗程式
建立專案檔
[info] 小提示:
範例程式碼:Github
目標是使用 MicroSoft Visual Studio 2019(或以上之版本)建立一個名為 Windows Forms App 的應用程式。
步驟 1. 首先新增 Windows Forms App(.Net Framework)專案,在此請使用[.Net Framework 4.7.2](含)以上的版本,接著為專案命名。本範例命名為 TerrainConverterApp。
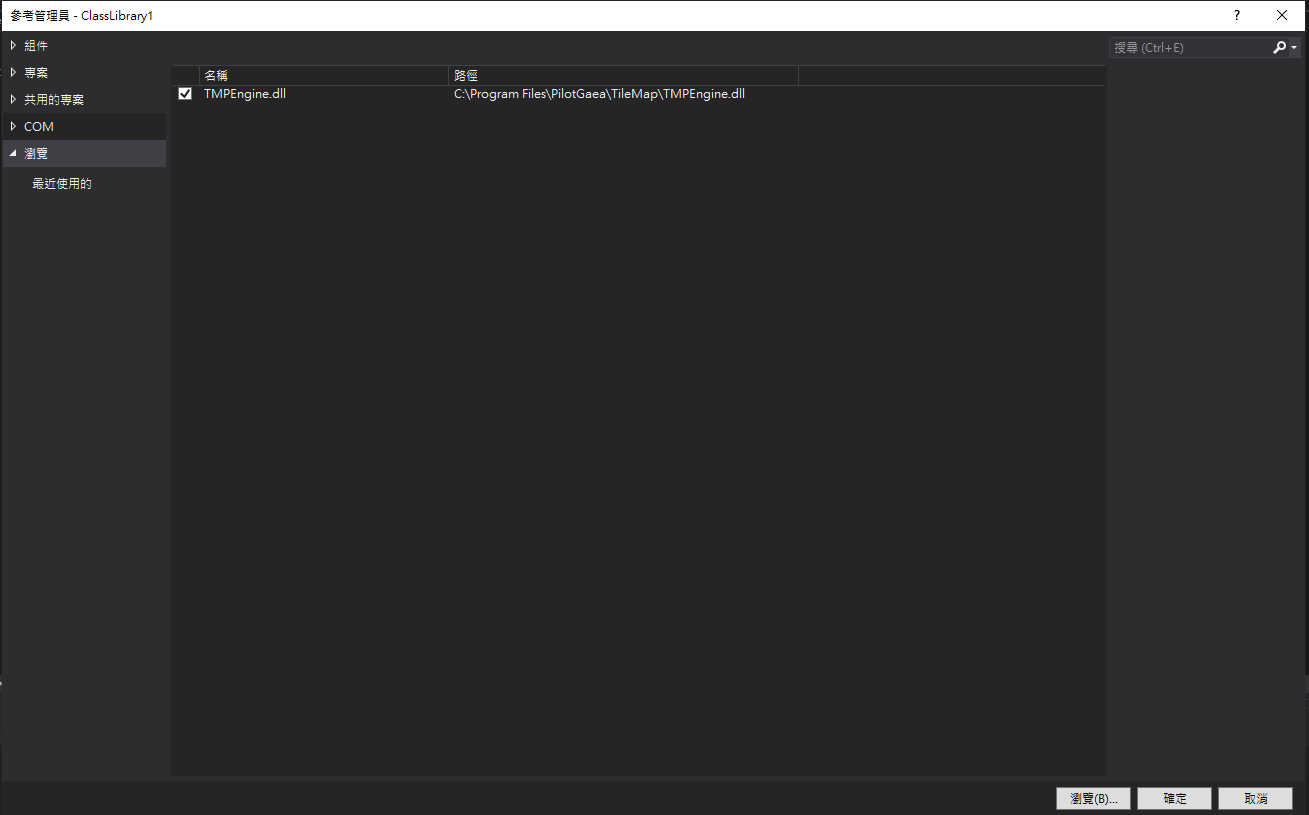
步驟 2. 請在右邊[方案總管]中找到[參考],點擊滑鼠右鍵後點選[加入參考…],視窗開啟後,選擇[瀏覽]頁籤,至安裝目錄下找到TMPEngine.dll檔案並按下[確定],即可將 TMPEngine.dll 加入參考。
步驟 3. 加入參考後請於 Form 的設計視窗點擊滑鼠右鍵,並按下[檢視程式碼]在上方加入以下程式碼:
using PilotGaea.Serialize;
using PilotGaea.TMPEngine;
using PilotGaea.Geometry;
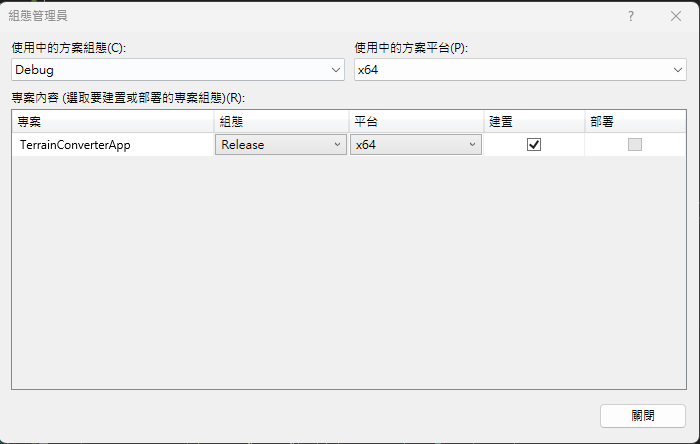
步驟 4. 請在組態管理員選擇適當的方案平台,設定為`x64執行模式,並選擇 Release 方案組態。
編寫轉檔程式
步驟 1. 建立 UI,於工具箱新增 ListBox、ProgressBar、ComboBox、Label、Button 控制項至表單中,將 ListBox 控制項的名稱設置為"listBox_Main",並雙擊 Button 控制項以建立按鈕點擊事件函式。

步驟 2. 於Form1()加入功能列表。
public Form1() {
    InitializeComponent();

    // 加入功能列表
    List<string> featureNames = new List<string>();
    featureNames.Add("基本");
    comboBox_Features.Items.AddRange(featureNames.ToArray());
    comboBox_Features.SelectedIndex = 0;
}
步驟 3. 在點擊事件函式中建立名為 maker 的 CTerrainMaker 物件,並將 UI 預設為關閉。
private void button_Start_Click(object sender, EventArgs e) {
    EnableUI(false);
    // 生成Terrain圖層。
    System.Environment.CurrentDirectory = @"C:\ProgramFiles\PilotGaea\TileMap"; // 為了順利存取安裝目錄下的相關DLL
    CTerrainMaker maker = new CTerrainMaker();
    Stopwatch m_Stopwatch = new Stopwatch();
}
private void EnableUI(bool enable)
{
    button_Start.Enabled = enable;
    comboBox_Features.Enabled = enable;
}
步驟 4. 為 maker 物件建立監聽事件,並於類別中新增事件函式。
m_Maker.CreateLayerCompleted += M_Maker_CreateCompletedEvent;
建立圖層完畢回傳設定:
 private void M_Maker_CreateCompletedEvent(string layerName, bool isSuccess, string errorMessage)
{
    string message = string.Format("轉檔{0}", (isSuccess ? "成功" : "失敗"));
    listBox_Main.Items.Add(message);
}
進度訊息回傳設定:
private void M_Maker_ProgressMessageChanged(string Message)
{
    listBox_Main.Items.Add(Message);
}
進度回傳設定:
private void M_Maker_ProgressPercentChanged(double Percent)
{
    progressBar_Main.Value = Convert.ToInt32(Percent);
}
步驟 5. 新增圖層。
- LayerName 為目標圖層名稱,可隨意取名。若 EXPORT_TYPE 不為 LET_DB,則為輸出檔名。
- LayerDBFile 為目標圖層的資料庫路徑,欲儲存的資料庫。若 EXPORT_TYPE 不為 LET_DB,則此字串為輸出路徑。
- demFileNames 為來源檔案集(.dem)。
- demEPSGs 為來源檔案(.dem) EPSG 集,長度須大於或等於dem檔案集。
- exportBoundary 為輸出邊界。
- isEllipsoid為是否橢球,將其參數設為
false。
// 設定必要參數
string layerName = "terrain";
string layerDBFile = string.Format(@"{0}\..\output\terrain_maker.DB", Application.StartupPath);
string[] demFileNames = new string[] { string.Format(@"{0}\..\data\terrain_maker\台灣高程3857.dem", Application.StartupPath) };
int[] demEPSGs = new int[] { 3857 };
GeoBoundary exportBoundary = null;
bool isEllipsoid = false;
// 設定進階參數
 switch (comboBox_Features.SelectedIndex)
{
    case 0: // 基本
        break;
}
步驟 6. 開始執行非同步轉檔。
// 開始非同步轉檔
bool ret = m_Maker.Create(layerName, layerDBFile, demFileNames, demEPSGs,exportBoundary,isEllipsoid);
string message = string.Format("參數檢查{0}", (ret ? "通過" : "失敗"));
listBox_Main.Items.Add(message);